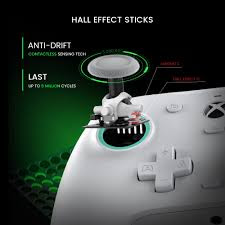


Hall Effect joysticks are widely regarded as a reliable, precise, and long-lasting solution for various applications, from gaming controllers to robotics and industrial equipment. Unlike traditional potentiometric joysticks, which rely on physical resistive components that can wear out over time, Hall Effect joysticks use magnetic fields to detect movement, offering significant advantages such as durability, precision, and smooth operation.
However, like all complex electronic systems, Hall Effect joysticks can encounter certain issues that impact their performance. Whether you are a manufacturer, technician, or user, understanding these problems and how to address them is crucial for maintaining optimal functionality. In this blog, we'll explore the common issues with Hall Effect joysticks, their potential causes, and how to fix them.
1. Inaccurate or Unresponsive Movement
One of the most common issues with Hall Effect joysticks is inaccurate or unresponsive movement. This can manifest as the joystick not registering slight movements or producing erratic outputs. Such problems can severely impact the user experience, especially in applications that require precise control, such as gaming or robotics.
Potential Causes:
- Sensor Misalignment: The Hall Effect sensor relies on the proper alignment of the magnetic field and the sensor. If the magnet and sensor become misaligned, even slightly, it can result in inaccurate readings.
- Dirty or Contaminated Sensors: Dust, dirt, or other debris can accumulate on the sensor, obstructing its ability to read the magnetic field correctly.
- Signal Interference: Electromagnetic interference (EMI) from nearby electronics can distort the Hall sensor's signal, leading to erratic or unresponsive behavior.
- Faulty Sensor or Magnet: Over time, the sensor or the magnet might degrade or fail, especially in environments with high temperatures or excessive usage.
How to Fix:
- Check and Realign the Sensor: Inspect the joystick's internal components, specifically the Hall sensor and magnet. If they appear misaligned, carefully reposition the sensor and magnet to ensure they are properly aligned. This might require disassembling the joystick, so ensure you're comfortable with the process or consult a technician.
- Clean the Sensor Area: Use a soft cloth and compressed air to clean any dirt or dust from the sensor area. Avoid using harsh chemicals that could damage the components.
- Reduce Electromagnetic Interference: If the joystick is used in a high-EMI environment, consider relocating the device or adding shielding to reduce interference.
- Replace the Sensor or Magnet: If the sensor or magnet appears damaged or degraded, replacing these components may be necessary to restore accurate operation.
2. Dead Zones or Sticking Movements
Dead zones, where the joystick does not register movement in certain areas of its range, or sticky movement, where the joystick feels resistant to movement, are other common problems users experience with Hall Effect joysticks.
Potential Causes:
- Mechanical Friction: Over time, the moving parts of the joystick (such as the shaft, gimbal, or spring) may experience friction due to wear or a lack of lubrication. This can cause the joystick to feel sticky or create dead zones.
- Magnetic Field Degradation: If the magnet used in the Hall Effect sensor weakens or becomes misaligned, it can result in inconsistent readings and dead zones in specific parts of the joystick's range.
- Improper Calibration: Joysticks often need to be calibrated to ensure they provide smooth and accurate input across the entire range of motion. An improper calibration may lead to dead zones or unresponsive sections.
How to Fix:
- Lubricate Mechanical Components: Disassemble the joystick and apply a small amount of lubricant to the moving parts, such as the gimbal or shaft. Be sure to use a lubricant that is safe for electronic components to avoid damage.
- Recalibrate the Joystick: Many modern Hall Effect joysticks come with calibration software or manual calibration procedures. Follow the manufacturer’s guidelines to recalibrate the joystick and eliminate any dead zones.
- Check for Magnet Issues: Inspect the magnet for signs of wear or misalignment. If you notice any irregularities, realign or replace the magnet to ensure the joystick operates smoothly.
3. Erratic or Jumping Output
Another issue with Hall Effect joysticks is erratic or jumping output, where the joystick’s movement is interpreted inconsistently or the values change unpredictably even when the joystick remains still. This issue can be frustrating in both gaming and industrial applications, where precise control is critical.
Potential Causes:
- Sensor Drift: Over time, Hall Effect sensors can experience drift due to temperature changes, aging, or electrical interference. This can result in fluctuations in the output signal.
- Electrical Noise: Electrical noise or fluctuations in the power supply can cause the sensor’s output to become unstable, leading to erratic movements.
- Faulty Wiring or Connections: Loose or damaged wiring can cause intermittent signals, resulting in jumping or erratic movement.
How to Fix:
- Check the Power Supply: Ensure the joystick is receiving a stable power supply. If you’re using the joystick with a microcontroller or PC, ensure that the voltage and current are consistent and within the device's specifications.
- Shield the Sensor from Electrical Noise: If electrical interference is suspected, consider adding shielding to the joystick’s circuitry to protect it from noise.
- Inspect Wiring and Connections: Check all wiring and connectors for signs of wear or damage. Tighten or replace any loose or faulty connections.
- Reset or Calibrate the Joystick: Perform a reset or recalibration of the joystick to clear any drift in the sensor’s readings.
4. Inconsistent Axis Movement
Another issue that can occur with Hall Effect joysticks is inconsistent movement along one or both axes. This means that while the joystick may perform well in one direction, the response might be irregular or imprecise along the other axis.
Potential Causes:
- Magnet or Sensor Misalignment: Inconsistent movement along one axis can often be traced to a misalignment of the magnet or sensor, which affects how the joystick registers movement along that axis.
- Damaged or Degraded Sensor: A damaged sensor or one that has been subjected to extreme conditions may begin to fail, leading to erratic or uneven movement on one or both axes.
- Mechanical Binding: If there is physical binding or resistance in the joystick’s moving parts, it could lead to inconsistent movement along one or both axes.
How to Fix:
- Realign the Magnet and Sensor: Open the joystick and check for any misalignment between the magnet and the Hall Effect sensor. Realign them carefully to restore even movement.
- Replace the Faulty Sensor: If the sensor is damaged or has degraded, it may need to be replaced. Consult the joystick’s manual or the manufacturer for replacement parts.
- Check for Mechanical Obstructions: Inspect the joystick’s moving parts for signs of binding, such as excessive friction or debris. Lubricate or remove any obstructions that could impede smooth movement.
5. Unstable or Flickering LED Indicators
Many Hall Effect joysticks come with LED indicators that provide feedback on the joystick’s status or movement range. Unstable or flickering LEDs can be a sign of underlying electrical issues or software problems.
Potential Causes:
- Power Supply Issues: Unstable or flickering LED indicators are often caused by fluctuations in the power supply. If the joystick is not receiving a consistent voltage, the LEDs may behave erratically.
- Short Circuits or Wiring Issues: A short circuit or loose connection in the joystick's wiring can result in unstable LED behavior.
- Faulty LED Components: Over time, LEDs can degrade or malfunction, leading to flickering or inconsistent light output.
How to Fix:
- Ensure a Stable Power Supply: Make sure the joystick is connected to a reliable power source. If using a battery-powered joystick, check the battery level and ensure it’s sufficiently charged.
- Inspect Wiring and Connections: Check the internal wiring for any signs of shorts, loose connections, or fraying. Repair or replace damaged wiring as needed.
- Replace the LED Components: If the LEDs themselves are faulty, they may need to be replaced. Consult the manufacturer for appropriate replacement parts.
Conclusion
Hall Effect joysticks are valuable tools in a wide range of applications due to their precision and durability. However, like any electronic device, they are susceptible to issues that can impact their performance. By understanding the common problems, such as inaccurate movement, dead zones, erratic output, and inconsistent axis movement, and knowing how to troubleshoot and fix them, users can extend the lifespan and functionality of their Hall Effect joysticks.
Regular maintenance, proper calibration, and prompt attention to issues like misalignment, wiring faults, and electrical interference can keep your joystick functioning smoothly. Whether you're a technician repairing industrial equipment or a gamer optimizing your setup, these steps will help you enjoy a smoother, more responsive experience with Hall Effect joysticks.


0 Comments