

Hall effect joysticks have gained significant popularity in various applications, ranging from gaming to robotics and drones, due to their precision, durability, and resistance to wear and tear. Unlike traditional potentiometer-based joysticks, Hall effect joysticks use magnetic fields to detect movement, offering a longer lifespan and more accurate readings. However, like any other device, they require calibration for optimal performance. In this guide, we will explore how to calibrate Hall effect joysticks for the best performance, ensuring a smooth and accurate experience.
What is a Hall Effect Joystick?
Before diving into the calibration process, it's important to understand the technology behind Hall effect joysticks. These joysticks operate using the Hall effect, which is a phenomenon where a magnetic field is applied to a conductor, causing a voltage perpendicular to both the current and the magnetic field. Hall effect sensors inside the joystick detect this voltage change, translating it into directional movement.
The primary advantages of Hall effect joysticks include:
- No Physical Contact: Since there are no physical contacts between moving parts, Hall effect joysticks have less wear and tear, making them more durable.
- Higher Precision: These joysticks offer better accuracy and smoother operation compared to traditional potentiometer-based joysticks.
- Resistance to Environmental Factors: Hall effect sensors are more resilient to environmental changes like temperature and humidity, which can affect potentiometer-based sensors.
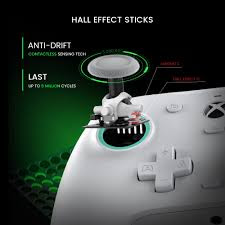
- Longer Lifespan: With minimal mechanical wear, Hall effect joysticks have a significantly longer lifespan than traditional joysticks.
Despite their advantages, Hall effect joysticks need to be calibrated periodically to ensure they deliver consistent and accurate performance. Calibration ensures that the joystick is in sync with the controller or device it’s paired with, providing reliable input data.
Why Calibrate Hall Effect Joysticks?
Calibration of Hall effect joysticks is essential for several reasons:
1. Accuracy and Precision
Over time, even high-quality sensors may experience slight drifts due to manufacturing tolerances, temperature fluctuations, or general usage. Calibration helps to reset the joystick's baseline values, ensuring that it responds accurately to movements.
2. Correct Centering
One common issue with joysticks, whether Hall effect or potentiometer-based, is improper centering. The joystick may not return to its neutral position (center) when released, leading to unwanted inputs. Calibration helps correct any offset in the center position.
3. Improved Responsiveness
When a joystick is calibrated properly, it ensures that the device or game responds immediately to any movement, without delays or erratic behavior. This is especially important in gaming and precision control applications like drones and robots.
4. Consistency Across Devices
If you are using the joystick with different devices or platforms, calibration helps to ensure consistency across all of them. This can be crucial for applications like gaming or when multiple systems need to work in tandem.
How to Calibrate Hall Effect Joysticks: Step-by-Step Guide
While the exact process of calibration can vary depending on the joystick's manufacturer and the device it's paired with, the general steps for calibrating a Hall effect joystick are relatively consistent. Below is a step-by-step guide on how to calibrate your Hall effect joystick for optimal performance.
Step 1: Check for Software or Firmware Calibration Tools
Many manufacturers provide dedicated calibration software or firmware tools for their Hall effect joysticks. These tools allow you to calibrate the joystick quickly and easily without having to manually adjust any settings.
1.1 Download the Calibration Software
If your joystick came with a software package, ensure you download and install it on your computer or device. For example, brands like Thrustmaster, Logitech, and Saitek often offer joystick calibration tools for use with their products. Check the product's manual or visit the manufacturer's website to find the necessary tools.
1.2 Launch the Software
Once installed, open the calibration software. You should see an interface that allows you to configure and test the joystick. Most of these tools will guide you through the calibration process, so follow the on-screen instructions carefully.
1.3 Perform the Calibration
The software will typically prompt you to move the joystick to its extremes in all directions: forward, backward, left, and right. It may also ask you to hold the joystick in its neutral (center) position. This step allows the software to learn the full range of motion and set a baseline for the joystick's movements.
After performing the required movements, the software will adjust the joystick's settings and save them for future use. Once completed, the joystick should be calibrated and ready to use.
Step 2: Manual Calibration (If No Software is Available)
If your joystick doesn’t come with calibration software, or if you're using it with a system that doesn’t support calibration tools, you can still manually calibrate the joystick by adjusting its internal settings or using system-level calibration features.
2.1 Access Calibration Settings in the Operating System
Both Windows and macOS offer built-in joystick calibration tools, which can be used to manually calibrate your Hall effect joystick.
For Windows Users:
- Open the Control Panel: Go to the Start menu and type "Control Panel."
- Devices and Printers: Click on "Devices and Printers."
- Right-click the Joystick Icon: Locate your joystick under the "Devices" section, then right-click on it.
- Game Controller Settings: Select "Game Controller Settings" and click "Properties."
- Calibration: In the properties window, go to the "Settings" tab and select "Calibrate."
- Follow the On-Screen Instructions: Follow the on-screen prompts to move the joystick in all directions and adjust the settings accordingly.
For macOS Users:
- Open System Preferences: Go to the Apple menu and select "System Preferences."
- Gamepad Settings: Select "Gamepad" or "Joystick" if available.
- Calibration: Follow the on-screen instructions to calibrate the joystick.
2.2 Adjust Centering and Dead Zones
Manual calibration may also involve adjusting the joystick’s neutral position and fine-tuning dead zones. A dead zone is the area around the joystick’s center position where small movements do not register. This is important for eliminating any unintended movements when the joystick is in its neutral position.
- Adjust the Dead Zone: Set the dead zone to a level where slight movements won’t trigger unwanted actions. However, ensure the dead zone is not too large, as it can cause delayed responses.
- Set the Neutral Position: If the joystick is not centering correctly, use the calibration tool to adjust the neutral position. This ensures that the joystick returns to the correct neutral point when released.
Step 3: Test the Joystick
After completing the calibration process, it’s important to test the joystick to ensure it’s performing optimally.
3.1 In the Calibration Tool
Many calibration tools have a "Test" feature that allows you to see the joystick's movement in real-time. Move the joystick in all directions, and check if the input corresponds accurately to the on-screen movements. Ensure there’s no lag or erratic behavior.
3.2 In Your Application
Test the joystick in the application or game you intend to use it with. Pay attention to its responsiveness, accuracy, and smoothness. Make adjustments as needed based on your testing results.
Step 4: Fine-Tune for Specific Applications
For certain applications, you might need to fine-tune the joystick further. For example, in drone flight or robotics, you might want the joystick to have different sensitivities or dead zones to match the specific needs of your project.
Some advanced systems allow for more granular adjustments, such as:
- Adjusting Sensitivity: Modify the joystick’s response curve, making it more or less sensitive to movements.
- Creating Custom Profiles: Save different calibration profiles for various applications or games. For example, you may want one profile for gaming and another for drone control.
Step 5: Regular Maintenance
Once your Hall effect joystick is calibrated, it's important to maintain it to ensure it stays accurate over time. Regularly clean the joystick to prevent dust or debris from affecting the sensors. While Hall effect sensors are less prone to wear, keeping the joystick in good condition will help it perform at its best for years.
Conclusion
Calibrating your Hall effect joystick is a critical step to ensure optimal performance, accuracy, and longevity. Whether you're using it for gaming, drone control, or other precision tasks, a well-calibrated joystick ensures that your inputs are recognized correctly and immediately. By following the steps outlined in this guide, you can ensure that your joystick performs at its best, giving you the smoothest and most responsive control experience possible.
Remember, calibration isn't a one-time process. Regular checks and fine-tuning will ensure that your joystick continues to deliver top-tier performance.

0 Comments